Tuesday, May 5
"Pages per Sheet"
A student came to the desk with a problem printing. She was trying to use the "Pages per Sheet" function in the printer settings to print 4 images on one sheet of paper. Unfortunately, when her file was sent to the print station the computer said she was trying to print 900 copies. As it turns out, the Mac computers were not set up to use the "Pages per Sheet " function, which was causing the error. Though it is also possible to create a photoshop document that contains the 4 images and use that to print, the easiest fix to the problem is to simply move to a PC and print from there.


The troubles and tribulations of installing Audacity (on a Mac...)
Hey everyone,
Someone came in today asking to use one of the studios to work on a podcast project. They asked which program to use for such a task and whoever was at the desk at the time suggested that Audacity would be a good choice. Fast forward to two hours later, the person working on the podcast was so impressed with Audacity that they decided to install in on their own MacBook. She tried to install Audacity and kept receiving a warning message which would prevent her from installing it on her laptop. So there are two reasons as to why this was happening:
Someone came in today asking to use one of the studios to work on a podcast project. They asked which program to use for such a task and whoever was at the desk at the time suggested that Audacity would be a good choice. Fast forward to two hours later, the person working on the podcast was so impressed with Audacity that they decided to install in on their own MacBook. She tried to install Audacity and kept receiving a warning message which would prevent her from installing it on her laptop. So there are two reasons as to why this was happening:
- Audacity is not currently on the Mac App store. This means that you have to install it by downloading it directly and installing it.
- If you are using any version of OS X that is 10.7 (Lion) or newer, you have any additional layer of security to get through since you are installing an application from an outside source.
Since 10.7, Apple by default blocks the installation of any application that does not come from either the Mac App store or from a list of pre-approved vendors. The people who produce Audacity have chosen not to list their application on the App Store and they are not on the list of approved vendors. To install Audacity, you should first follow the instructions and download links from Audacity's website; These can be found here. Once you get to the end of those directions, if you are on 10.7 or newer you will get a message that looks like this:
 |
| You'll see this, but with about 200% more Audacity references. |
When you get this message, Audacity will not complete its installation until you do the following:
- Go to Mac Preferences.
- Navigate to the Security and Privacy menu.
- Click the "Open Anyway" button.
 |
| If it says "Audacity was blocked" you should probably click that button. If it says something else, you're on your own. |
Now Audacity will finish its installation and will work properly on someone's personal laptop.
-Have a good week everyone, Stephen
Monday, May 4
The Law of the Land (in the studios)
Hey everyone this is just a reminder of the studio rules with the end of the semester nearing and the center getting much busier. Lately I've noticed several of the studio doors left unlocked. Remember, the studio doors MUST remain locked at all times. If you are an employee letting a user in, you can ensure this by turning the key clockwise rather than counter-clockwise. This will unlock the door until you remove the key where it will lock up again.
Some other important guidelines to follow or what the the studios may, and may not be used for:
Type of Studios
Studio uses
Users can reserve a studio:
Some other important guidelines to follow or what the the studios may, and may not be used for:
Type of Studios
- Four digital editing studios (Two Mac and two PC)
- One digital design/skype studio (Contains a Wacom drawing tablet)
- One sound studio (Contains an audio deck)
Studio uses
Users can reserve a studio:
- to rehearse a presentation (only if it is complete and ready to practice)
- to film, capture, or edit videos
- to take still photographs
- to record or edit audio
Users can not reserve a studio:
- to work on a Photoshop graphic (unless in studio #5)
- to edit or assemble a Powerpoint or other presentation
- to work on editing web pages
- to study
- to work on a project that is not multimedia related
Studio time limit
Studios can be reserved for two hours at a time up to 7 days in advance. If a user needs more time, they may come out 15 minutes before their time is up and if no one has the room reserved after them, they may reserve another two hours.
Green Screen Usage
Green screens can be put up on request. We ask that the user tell us ahead of time so that we can have ample time to set up and take down the screen.
Employees: Mark off a 30 minute block before and after the reserved time period in the reservation list
General Rules
- NO food or drinks allowed in the studio (drinks with lids are allowed OUTSIDE of the studio)
- DO NOT stand behind the cameras in the studios, please stay off to the side and adjust the camera from there
- Users MUST use the equipment in the studios
- Please DO NOT stand on chairs or adjust the ceiling lights, ask a staff member
- DO NOT leave the door propped open, the staff will be happy to let you back in
Helping Users Re-size PDFs on Windows
Hi everyone,
It looks like we are wrapping up that time of year when posters are being printed quite frequently for the Blue Hen Leadership Program. During what we affectionately know as "Poster Fest", there have been problems encountered and solutions found. But before we can roll out the poster-printing, we have to make sure that the user's file is in the correct format. As we all know the golden rules are... 1. PDF and 2. One side no longer than 35.5 inches!
So when a user comes to the desk with a PowerPoint file and/or it is 36 inches (so close yet so far...), we kindly instruct them to make the changes either on their own computers or on one of the Center's desktops. While we should not make changes for them behind the desk, we can surely offer help in doing this. If you are not sure how, here is a previous blog post (okay, I like posters I guess).
But what happens when the user has an incorrectly sized PDF but not the original .ppt file? This is where things can get complicated. Acrobat Pro cannot re-size a document, even if it is just that pesky little half inch! A PDF alters in dimensional size with respect to the page size it is assigned to. Jay had told me about Neevia last semester, a website in which you can alter the dimensional size of a PDF. In attempting to find a method that does not involve a third party, I want to share something that may be helpful not only with poster printing, but really re-sizing any PDF to practically any size that you want.
First, open your PDF and go to File>Print. The following box will appear.


It looks like we are wrapping up that time of year when posters are being printed quite frequently for the Blue Hen Leadership Program. During what we affectionately know as "Poster Fest", there have been problems encountered and solutions found. But before we can roll out the poster-printing, we have to make sure that the user's file is in the correct format. As we all know the golden rules are... 1. PDF and 2. One side no longer than 35.5 inches!
So when a user comes to the desk with a PowerPoint file and/or it is 36 inches (so close yet so far...), we kindly instruct them to make the changes either on their own computers or on one of the Center's desktops. While we should not make changes for them behind the desk, we can surely offer help in doing this. If you are not sure how, here is a previous blog post (okay, I like posters I guess).
But what happens when the user has an incorrectly sized PDF but not the original .ppt file? This is where things can get complicated. Acrobat Pro cannot re-size a document, even if it is just that pesky little half inch! A PDF alters in dimensional size with respect to the page size it is assigned to. Jay had told me about Neevia last semester, a website in which you can alter the dimensional size of a PDF. In attempting to find a method that does not involve a third party, I want to share something that may be helpful not only with poster printing, but really re-sizing any PDF to practically any size that you want.
First, open your PDF and go to File>Print. The following box will appear.
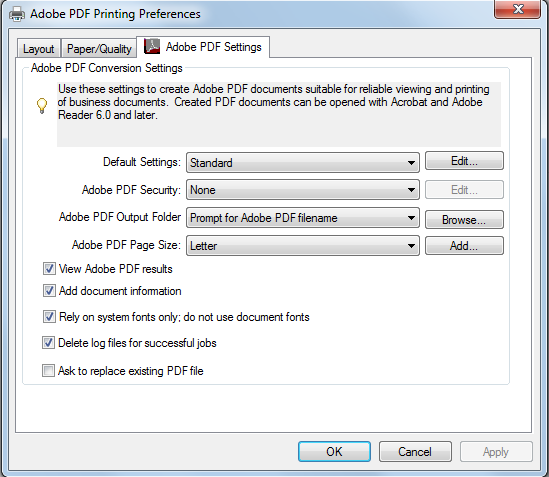
Make sure that the Printer is "Adobe PDF." Now go to START>Devices and Printers. Right click on "Adobe PDF" and choose "Printing Preferences." You will see the following box.
Go to "Adobe PDF Page Size" and choose "Add." The following will appear. Populate the fields with your desired dimensions and name this something you will associate the size with. Press "Add/Modify."
Now back in Acrobat, still on the Print menu, go to Page Setup and select the page size you just created. Make sure "Fit" is selected, or your content will remain the same size just surrounded by lots of white space. Select print to create your new PDF. This may take some time.
Always remind users to look at the final product before giving it to us. They want to make sure that there are no undesired changes occurring between sizing. Hopefully this is helpful and will be a relief to those who have lost their original PowerPoint files.
Sunday, May 3
Please remember the kit number when using the paper checklist!
Today, an advanced camera kit was returned but the corresponding active checklist was not in the folder. We discovered that it was in the returned checklist and had been wrongly checked in yesterday. Apparently, the kit number was not written down during checkout and when another advanced camera kit was returned, it was checked in using the checklist with the blank kit number. Obviously this led to some confusion, so please always remember to include the kit number when filling out the paper checklist. Thanks!
Friday, May 1
Importing and Exporting 3D Models with Blender
You may start a project in one program and later realize that you don't have access to that same program at a later date. For example, if you started a 3D model in Autodesk's popular 3D computer graphics software Maya and want to work on it later at the SMDC, you might be upset to know that our computers only have Blender installed.
A solution to this problem is to export your models as an .fbx, .dae, or an .obj in addition to saving your project in the program's native file format (.ma and .mb for Maya). These three file formats are considered to be universal formats, and most 3D computer graphics programs offer the option to import and export these file types.
If you want to import/export these file types in Blender, simply select File > Import or File > Export from the top left drop down menu. While .obj and .dae file types are nearly identical, .fbx is better suited for animation.
Have fun and keep on making stuff!
Thursday, April 30
Split-screen Video in Adobe Premiere
First, you just have to drag the two clips you want to use in the timeline at the bottom together on top of one another like so:

Now the video you have on top will appear in the preview in the top right. To select the video simply double click the preview and a box will appear around it that you can then use to scale and move the clip around in the frame. The second clip will be hiding directly underneath the top clip and you can then do the same thing with that one:

For some reason the split-screen video effect is something I always found pretty interesting, it's useful when you're portraying a difference or trying to make a comparison like I did in this video I made for my Digital Marketing class. I hope this was helpful!
Subscribe to:
Posts (Atom)